Step-by-Step Instructions
Step 1: Prepare the Beef Filling
Cook the beef – In a large skillet over medium-high heat, add the ground beef. Break it apart with a spatula, cooking until it’s no longer pink (about 5–6 minutes). Drain excess fat if necessary.
Add aromatics – Stir in the diced onion, garlic, and bell pepper. Cook for 3–4 minutes, until softened and fragrant.
Season it up – Add cumin, chili powder, smoked paprika, oregano, coriander, salt, and black pepper. Stir well so the spices coat the meat evenly.
Richness boost – Stir in the tomato paste and cook for 1 minute to caramelize slightly.
Moisture & meld – Add the diced green chilies and beef broth. Reduce heat to medium and simmer for 5 minutes until slightly thickened. You want a moist filling, but not too wet (otherwise it will sog up your tortilla).
Taste & adjust – Add more salt or spice to taste. Remove from heat and let cool for 5 minutes before adding cheese.
Step 2: Add the Cheese
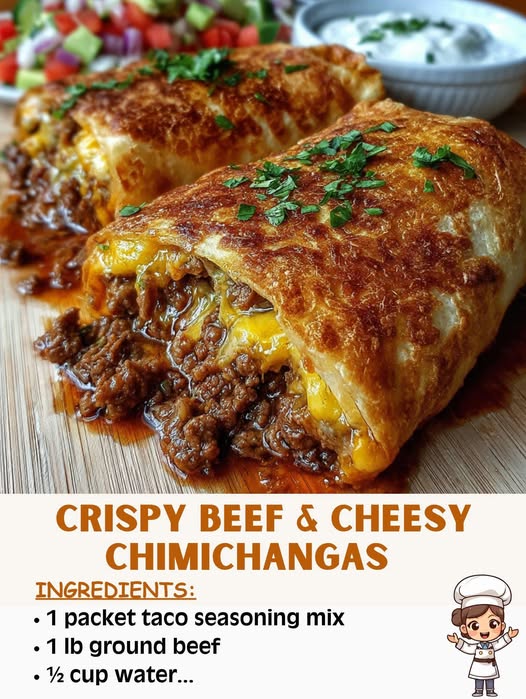
Sprinkle in the cheddar and Monterey Jack cheeses, reserving a small handful of each for topping if desired.
Stir until the cheese is just beginning to melt into the beef mixture.
The filling should now be rich, thick, and scoopable.
Step 3: Assemble the Chimichangas
Warm tortillas – Microwave them for 20 seconds, or wrap them in foil and warm in a 300°F (150°C) oven for 5 minutes. This makes them pliable and prevents cracking.
Filling placement – Lay a tortilla flat. Spoon about ¾ cup of the beef filling into the center.
Fold burrito-style – Fold the sides over the filling, then fold the bottom up and roll tightly toward the top. Secure with toothpicks if needed.
Repeat with remaining tortillas and filling.
Step 4: Fry to Crispy Perfection
Pan-Fry Method (Recommended for Authentic Crisp):
Heat 3–4 cups of vegetable oil in a deep skillet to 350°F (175°C). Use a thermometer—too hot will burn the outside before the inside heats; too cool will make them greasy.
Fry 2–3 chimichangas at a time, seam-side down, for about 2 minutes per side, or until golden brown.
Transfer to a wire rack or paper towels to drain excess oil.
Oven-Baked Version (Lighter but Still Crisp):
Preheat oven to 400°F (200°C).
Brush each chimichanga lightly with vegetable oil or melted butter.
Place seam-side down on a baking sheet lined with parchment.
Bake for 20–25 minutes, flipping halfway, until golden and crisp.
Air Fryer Version (Fast & Crispy):
Preheat air fryer to 375°F (190°C).
Spray chimichangas lightly with cooking spray.
Arrange in a single layer (don’t overcrowd).
Air fry for 8–10 minutes, flipping halfway, until golden.
Step 5: Serve with Style
Arrange the crispy chimichangas on a platter and serve with:
A dollop of sour cream
Fresh salsa or pico de gallo
Creamy guacamole
Lime wedges for a bright squeeze of acidity
A sprinkle of fresh cilantro for freshness
Tips & Tricks for Perfect Chimichangas
Don’t overfill – Too much filling makes them hard to seal and prone to bursting.
Secure the seam – Use toothpicks while frying; remove before serving.
Fry in batches – Overcrowding lowers oil temperature and leads to soggy chimichangas.
Keep warm – Place cooked chimichangas on a baking sheet in a 200°F oven while you finish the rest.
Cheese variation – Add cream cheese for a tangy, creamy twist.
Make it spicy – Use hot green chilies, pepper jack cheese, or add chipotle powder.
Variations
Shredded Beef Chimichangas – Use slow-cooked shredded beef instead of ground.
Chicken & Cheese Chimichangas – Substitute shredded cooked chicken with taco seasoning.
Bean & Cheese Vegetarian Chimichangas – Use refried beans, sautéed veggies, and cheese.
Breakfast Chimichangas – Fill with scrambled eggs, bacon or sausage, and cheese.
Make-Ahead & Freezing
To Refrigerate: Assemble uncooked chimichangas, wrap in plastic, and refrigerate up to 24 hours before frying/baking.
To Freeze: Wrap each unbaked chimichanga tightly in plastic, then foil. Freeze for up to 3 months.
Cooking from frozen: Fry at 325°F for 4–5 minutes per side, or bake at 375°F for 35–40 minutes.
Serving Suggestions
Chimichangas are hearty on their own, but they shine when paired with:
Mexican Rice – Lightly spiced, tomato-flavored rice balances the richness.
Refried Beans – Creamy and filling.
Grilled Corn Salad – Adds a smoky-sweet crunch.
Simple Side Salad – Fresh lettuce, tomatoes, avocado, and lime dressing.
Storing & Reheating
Fridge: Store leftovers in an airtight container for up to 3 days.
Reheat in oven or air fryer: 350°F for 8–10 minutes to restore crispness.
Microwave: Fast but softens the tortilla—best for when you’re in a rush.
The First Time I Made These…
The first time I made chimichangas, I didn’t know about securing them with toothpicks. Half my batch unrolled in the oil, turning my kitchen into a beef-cheese soup disaster. Lesson learned. Now, I make them assembly-line style, double-fold the seams, and fry them confidently. Over time, this dish has gone from a “special occasion treat” to something my family asks for at least once a month. And when I make them for friends, I never have leftovers—ever.
Final Thoughts
These Crispy Beef & Cheesy Chimichangas aren’t just a recipe—they’re a little celebration on a plate. The combination of flavorful beef, melty cheese, and a perfectly crisp tortilla is irresistible. Whether you fry, bake, or air fry them, they bring that Tex-Mex restaurant flavor into your home kitchen.
And fair warning: once your family tastes these, you’ll probably get requests for them over and over. Luckily, they’re easy to make, freezer-friendly, and endlessly adaptable.
